DIY RGB Lightbar from scrap
I resurrected some old garbage from building the cube to build a lightbar.
I resurrected some old garbage from building the cube to build a lightbar.
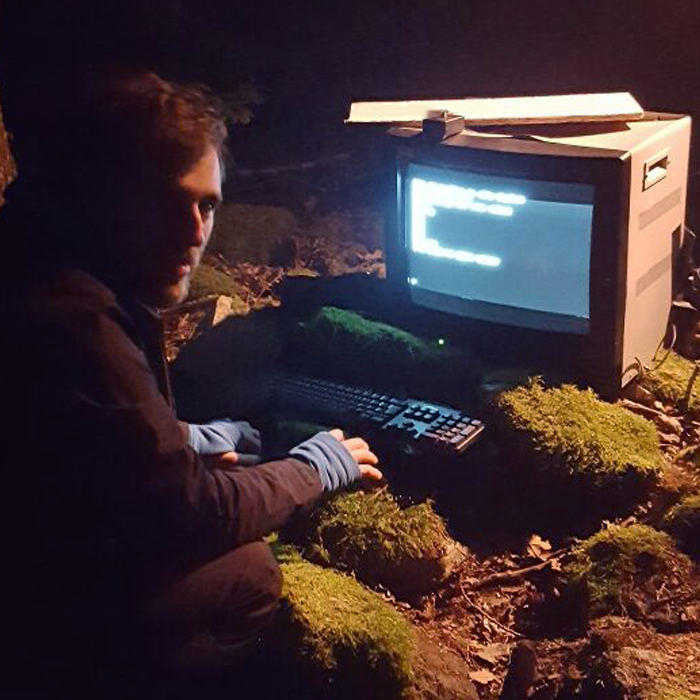
Remember this post? Well, we broke the sign at MCH last year so time to build a new one.
Back again with yet another odd protocol to dive into. This time around we’re tackling a pixel protocol named DDP. DDP is another small homebrew protocol that aims to squeeze in as much pixel data as possible into one ethernet frame (1500 bytes) in order to maximize transmission efficiency over local networks. When you’re driving large scale LED installations, the overhead starts mattering as you have to introduce other complexity to deal with it (TCP, packet protocols etc). Especially in applications where lost data matters less than latency and throughput.
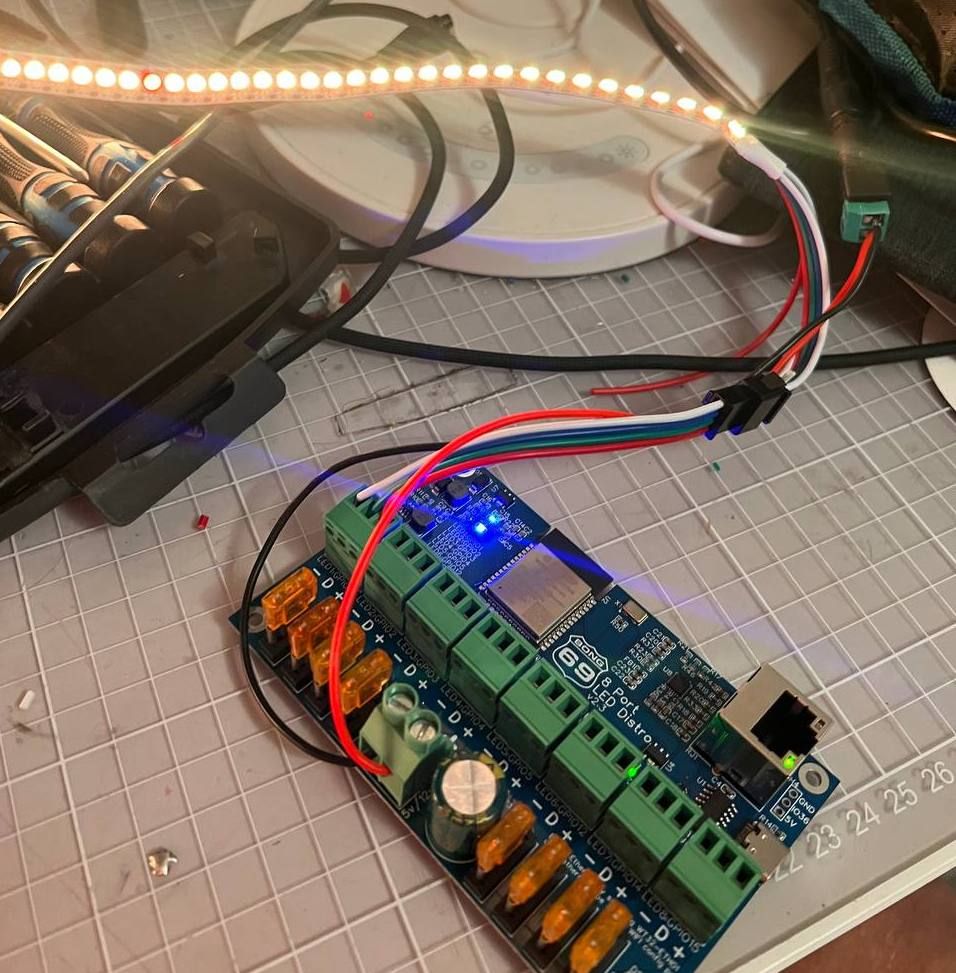
I ended up in this hole as I purchased the 8 Port LED Distro by Bong69 (what a name) which is a small ESP32 controller wired up with an ethernet port, level shifters, fuses and 8 output connectors for driving LED strips like WS2811/WS2812. The controller runs a piece of software called WLED, an open source project implementing a wide variety of different features to drive everything from holiday lights to installations. Reality is I just wanted a simple controller that solved the output problem so that I could stream pixel data to over wired ethernet. The alternative was that I would write software for a Teensy but given that life has changed to a degree, time is a precious resource these days.
WLED supports E1.13, ArtNet, DDP and tpm2.net and their own UDP realtime protocol. ArtNet and E1.31 are originally protocols to control light fixtures and suffers from those compromises (maximum 40FPS framerate for DMX compatibility, multicast) which ruled them out. I started out implementing tpm2.net but quickly realized that the only real user of this protocol seemed to be a German bespoke LED controller manufacturer. That left DDP as the preferred protocol to pursue.
DDP is defined by 3waylabs and seems to be their preferred protocol for their art installations. The webpage has some mentions of burning man so going to assume it’s yet another burning man LED installation developer. What I liked about DDP is that it’s extremely smart in how it packs the metadata into the bitstream. DDP makes use of every available bit, which yields a header no larger than 10 bytes. Compare this to E1.31 where the header is 126 bytes. Modern computers don’t care but for a small microcontroller parsing data, this ends up having an impact on the amount of frames per second you can push. DDP sits in the middle here as “sane” compromise. It doesn’t mandate a framerate, it’s spec agnostic to if you send it over UDP or TCP (although I suspect most vendors only accept UDP) and it’s open ended in that it relies on JSON for messaging. Only drawback is that clients needs to implement JSON parsing if they want to be smart but that’s tablestakes at this point for anything connected.
I was set on trying leveraging Copilot and ChatGPT this time around to save time and bonged out a go implementation in an evening. Coming back to Go always makes me realize how good Rust is. If you took Go, added the Result type and enum pattern matching from Rust you would have the perfect language but sadly we’re bound by the C conventions imposed by Rob Pike and friends. After verifying that the Go implementation sent the right bytes, I hooked up the WLED controller which of course did not work. Turns out that WLED wants to open a return connection to the incoming address for it to accept DDP.
Having a working Go implementation helped in thinking about how to design the Rust version of this. With Go I took some architectural liberties that are forbidden in Rust. On top of that, the Go implementation only implements the subset that allows you to send pixels, not control the display. I took the same approach here, using ChatGPT to assist but it quickly turned out that I had to do a lot of manual work as ChatGPT struggled to understand the documentation. The documentation relies a lot on formatting to convey the spec and ChatGPT didn’t see that nuance.
After another couple of days of bashing, ddp-rs was now working. Since I cared a bit more about implementing the entire spec this time around, I wrote some more serious tests to both encode and parse DDP. To test my library, I used WLEDs “output mode” in which it can spit out a DDP stream and this is where it started getting weird. My test failed on parsing the bits per pixel from WLED, being offset by 2. As always when programming, I assumed it was my fault and started digging. After going back and forth on the spec for hours I could not understand how the value WLED was sending would be correct at which point it was time to jump into the WLED source code.
After digging a bit I was convinced that WLED had implemented it wrong. WLED just hard sets these values in config instead of calculating them (nothing wrong with this, faster for their use case) and the values were wrong, but why? I opened a pull request with changes and one of the maintainers immediately asked me to fix it upstream. After reviewing the upstream repo, it turns out that the WLED developers hacked DDP support on themselves and DDP isn’t in the upstream repo. The maintainer shares that the spec they implemented a while back was different. I used the waybackmachine and it turns out they were right, the spec actually has changed over time. At this point, the only way to clear this out is to email the person who wrote the spec and ask them what’s the actual story behind this value. I emailed and got an answer quickly and it turns out that this field was initially “to be defined later” but a lot of people started wanting RGBW support in WLED, which pushed the author of the protocol to implement something quick that later changed. WLED was still on the “initial” implementation. After that, the pull request was accepted and I could return back to sanity.
Long story short, I implemented DDP for Rust. In case you ever need it, enjoy.
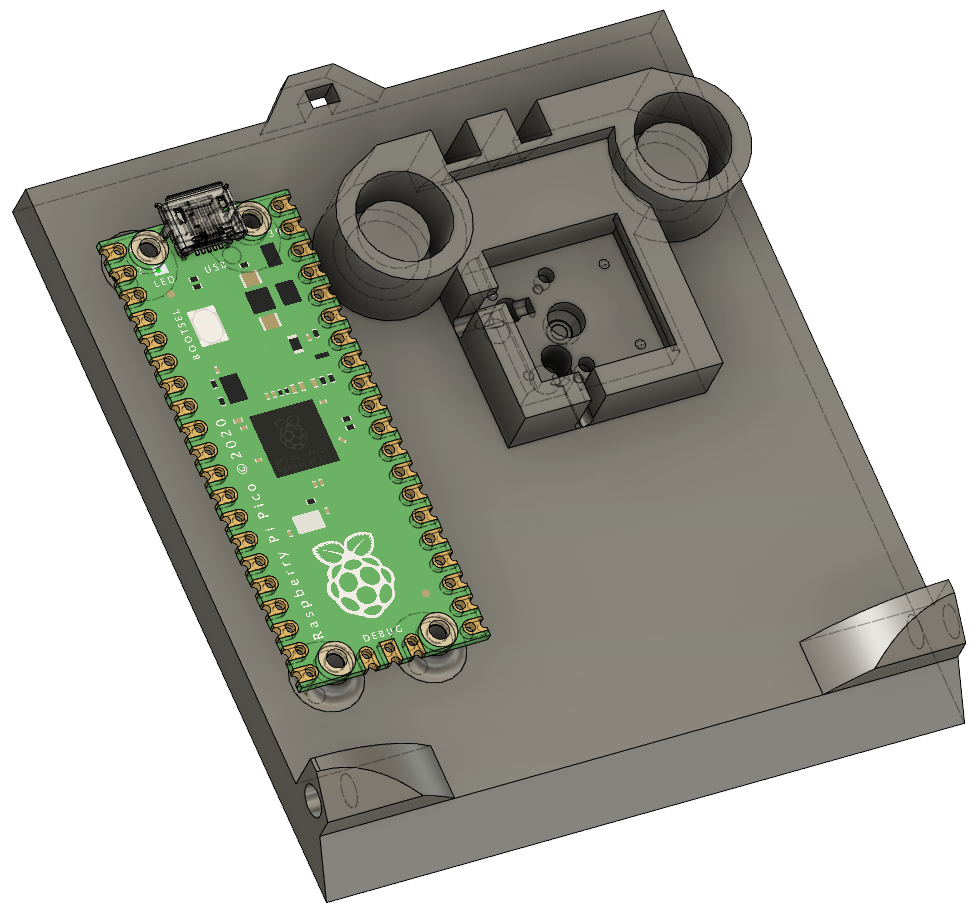
About 1,5 years ago I designed & 3D printed a very simple USB foot pedal that I use for PTT (Push To Talk) with virtual meetings. After heavy use I managed to break the USB port on the microcontroller I was using so it stopped working.
I could have just bought a new Adafruit Feather 32u4 but at $20 it’s in my opinion quite expensive for what you actually get these days. Since using that microprocessor, Raspberry Pi has launched their own microcontroller called RP2040 and their tinker board called Raspberry Pi Pico. Not only does this board cost $4 but has dual cores and the ability to act as an USB host. That’s not all, the fact that this board is open and a stable target makes it a great opportunity to rewrite the horrible C++ code in Rust. I’ve become a big fan of the language but never used it with microcontrollers so this was a great opportunity to try it.
I redesigned the sketch to fit a RPI PICO and wrote the code and posted it on github as usual. There is some fun jank as the chip expects the interrupts to be signaled to the controller by poking some register, hence why I used statics to ensure that the address wouldn’t be empty.
What surprises me about this is how good the Rust developer experience translates to working with microcontrollers. With the setup in the repo, all you have to do is run cargo run --target=thumbv6m-none-eabi --release and cargo will build, pack and program the RPI PICO without you having to install toolchains, programmers etc. It just works out of the box.
MCH is a huge hacker camp in the Netherlands that runs every 4 years (with some timeline adjustments due to COVID). I attended the previous version in 2017 and decided to bring more than just myself this time around. As a continuation of the experimentation with YouTube I made this behemoth of a video about my experience going down to MCH, enjoy!
I got a few questions from people that watched what went into creating it so thought that I would spend some time on explaining it. I started with the rough thinking around what I wanted to capture before even flying to Sweden. Wrote down a number of scenes that I hoped to capture from what I imagined would happen and ranked them in order of importance. Given, almost none of these scenes actually occurred in real life but the work of ideating allowed me to select the right gear to film with. What the exercise outlined was:
Reality here is that I wanted something that would do great on full automatic where I could push the material in post. I had no idea what style would fit so capturing as much as possible seemed like the best path forward. How does one go about doing this? Cameras today allow you to film in formats closer to RAW which helps unlock this functionality.
Back when digital cameras started becoming popular, most cameras shot in either JPEG or TIFF. Both of these formats are “consumption” formats which require the camera to essentially bake the image from the sensor down to something that could be viewed. Photographers coming from analog film quickly realized the freedom they had in manipulating the negatives to adjust for color and exposure was much more limited with digital since the camera had taken those decisions at time of exposure. To solve for this, manufacturers developed a variety of formats, commonly referred to as RAW images. “RAW” essentially means packaging data from a camera sensor into the file without the decisions made.
So instead of saving a compressed file, the camera spits out the data from the sensor to the memory card without any image processing applied to the file. Since the sensor is made up of individual red, green and blue sensors that capture light it means that it saves the image “bayered”. Tones and colors are also not processed by the camera, meaning that what should constitute “blue” in the picture is left out of the decision making. This is saved at the native bit depth of the camera, meaning there is more information available for every pixel in the image to work later. So if you underexposed a tree, there might be enough information in the blacks to pull that. Above an image processed by lightroom, let’s look at the RAW representation of this image.
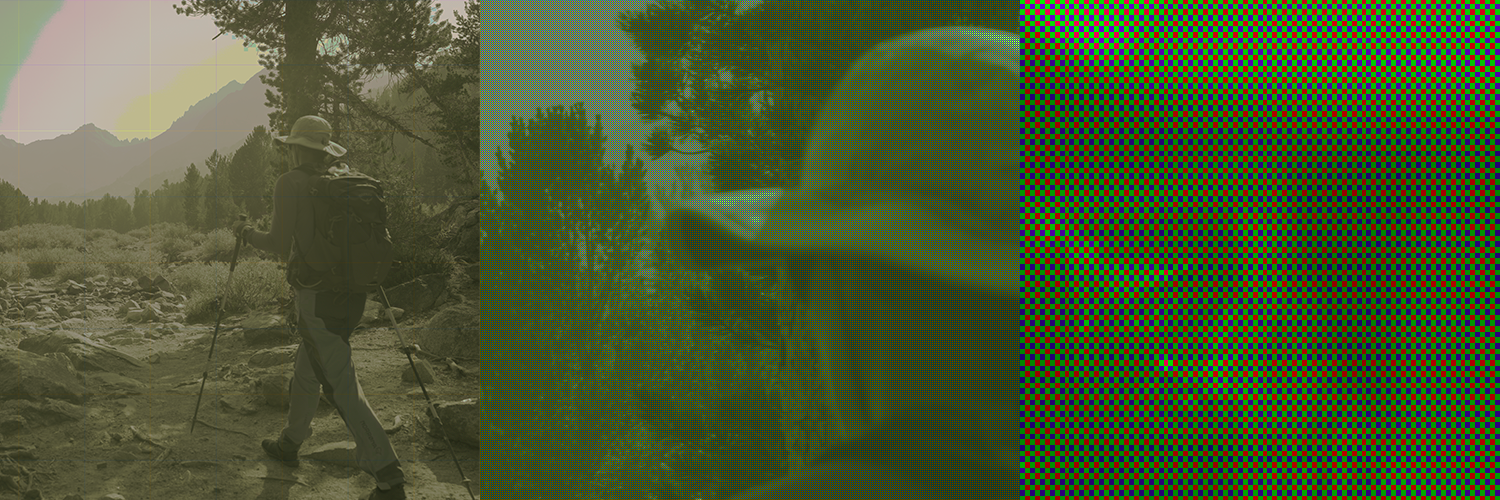

You can see that the camera perceives the world very differently to what the final product looks like and in a normal case, the camera will do the work of what Lightroom did above in camera. However if you look at the mosaiced representation, you can also see how much additional data there is in the image. Parts of the image that are dark are in this representation full of additional data which allows us to extract detail from areas that otherwise would lack the depth of data. This magical ability stems from the fact that we have a higher bit depth, a “flat” color profile and the bayer data to infer data about the color surrounding the pixel we are trying to demosaic into a normal image pixel.
Bit depth here is probably the most important part of the puzzle. The image was shot with a Sony A7 IV which shoots images at 14 bits per pixel. 14 bits per pixel might seem awfully a lot considering that normal computer screens only display 8 bits per pixel. In short, 8 bits per pixel means 2 ^ 8 = 256, 256 different levels per color for a total of 256 ^ 3 = 16 777 216 16 million different representable colors. 16 million colors sounds like a lot, why do we need more than this to work with images? If you think about it, these colors are often not evenly distributed. Our eyes do not perceive brightness linearly, rather it’s much more perceptive to luminance changes in “darker” areas compared to light areas. 1 On top of that, there just isn’t enough “difference” if you scale up the data in the lower parts of the bands to create a good image. To illustrate this I’ve created an image where the top part is an 8 bit image with colors going between 0 -> 16. The bottom half expands the luminance so 0 maps to 0, 8 maps to 128 and 16 maps to 255.
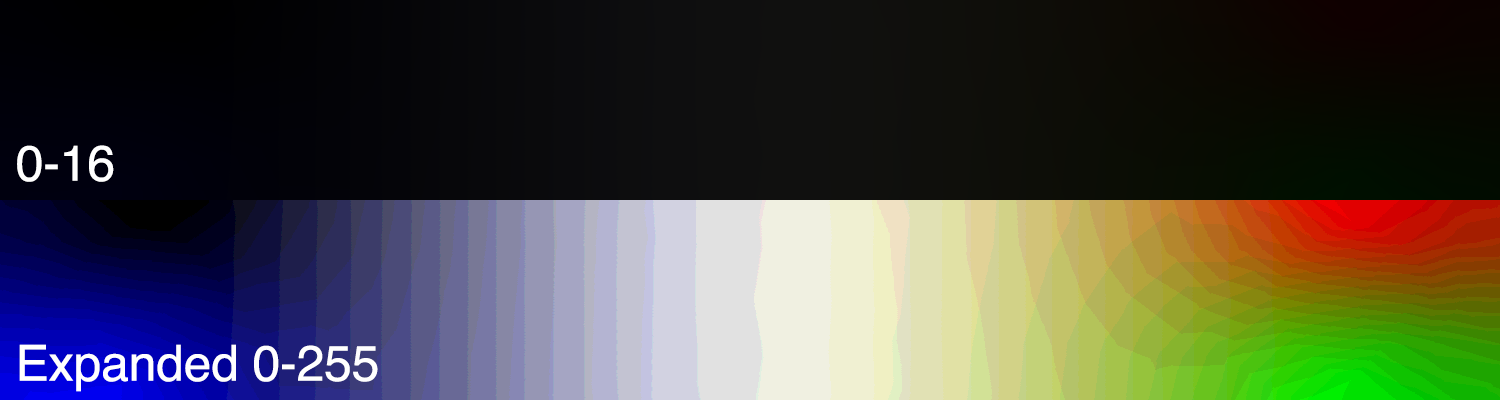
What you can see is that we get what’s known as color banding, perceivable differences between the colors as a result of insufficient detail when projecting the bits out to adjust exposure. So what if we had more bits to work with? 14 bits per pixel 2 ^ 14 = 16 384 colors per pixel -> 16384 bits ^ 3 colors = 4,398,046,500,000 gives us 4,398 trillion colors to work with. So if we use the earlier example where we had 2 ^ 4 = 16 ^ 3 = 4096 we suddenly have closer to 1024 colors per pixel, meaning 1024 ^ 3 = 1073741824 closer to 1 billion different shades of color within the same color band.
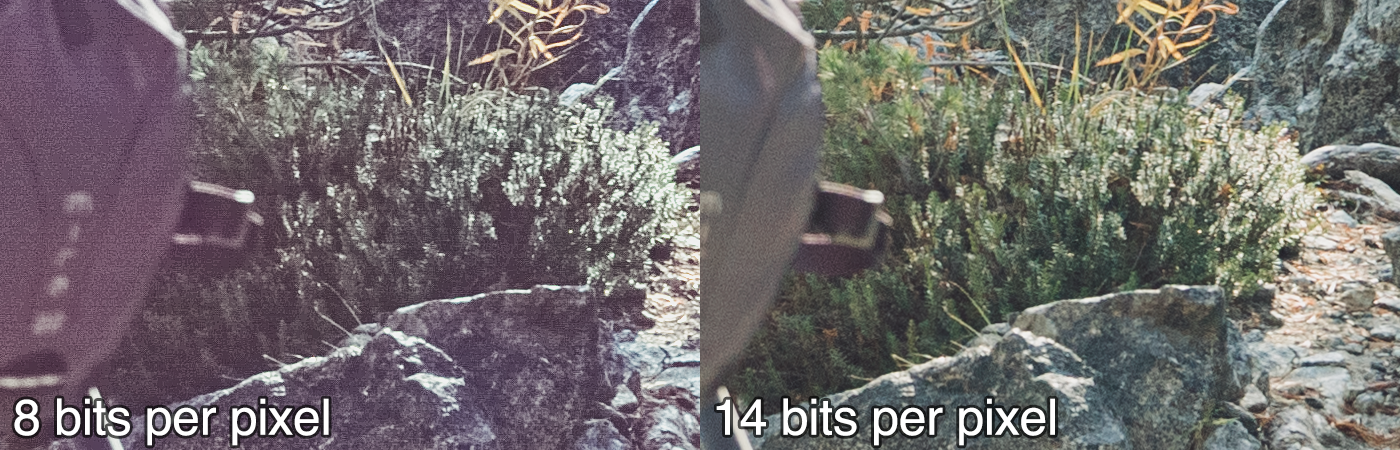
This allows us to extract detail in images that would be impossible to retain, both from a color accuracy standpoint and detail standpoint as is obvious above. I used the same image posted above, exported it as TIFF with 8 bits per pixel and applied the same adjustment to both of these which shows you how much detail higher bit depth preserves.
In standard camera industry fashion, no one managed to actually decide on a “standard” format for RAW meaning that almost every manufacturer is using their own format for their cameras. Canon uses CRW (Canon Raw), Nikon runs NEF (Nikon Electronics Format), Sony has ARW etc. Adobe tried to define a standard with DNG which of course went the way of the classic XKCD on standards. Reality is that the “photo management” software (Lightroom, Capture One, Darktable) ended up solving for these differences by unifying the RAW processing with their own image lookup engine. Meaning that at the end of the day, the tools normalize the differences between cameras into an interface that allows the photographer to work with the images the same way regardless of camera.
Ok so if you thought this was bad, wait until we enter the realm of video. Since a single RAW image at 4K resolution comes in at around 7-15 MB depending on format, that means that a single second of video would take up to 450 MB. Considering the size of portable storage around the time when RAW photography started becoming popular, storing this from a video camera would be unfeasible. Luckily we have a lot of already developed video compression algorithms using both spatial and temporal compression. I won’t go into the details of video compression but it’s fair to say that every single space-reducing option is exploited, including decreasing bit depth and chroma subsampling.
Contrary to the still image cameras mentioned earlier, most “cinema” cameras are out of reach to normal consumers where this technology pioneered. Cinema cameras are prohibitively expensive with the ARRI Alexa costing more than $100k when coupled with lenses and required accessories. Companies like RED launched REDCODE and ARRI launched ARRIRAW for their ALEXA line of cameras. This meant that the early RAW formats for video ended up being closer to digital intermediates where productions could afford buying 30 proprietary memory cards at $1000 a piece. These formats aim to store as much data as possible and are often “lightly” compressed to facilitate faster playback on desktop computers. Most of these codecs are even built to be GPU accelerated for decoding, as the same methods make them easier to encode on silicon.
“Prosumers” looked at this and quickly realized this was out of their budget and kept shooting H.264 in a variety of flavors. DSLR cameras started to get the ability to record video, getting serious when the Canon 5D Mark II became the first EOS camera to shoot video. It quickly became obvious that the image quality from these cameras coupled with a real lens was superior to that of “professional camcorders”. This ended up giving prosumers the ability to shoot “cinematic” looking footage for the first time without renting a real cinema camera and kickstarted a boom of people shooting features, documentaries and music videos on DSLRs.
So here you have two parallel developments, one aiming to simulate film cameras as closely as possible and one becoming the tool of choice for entry filmmakers almost by mistake. There was however a catch, the DSLRs made all the decisions in the video at time of recording, similar to what your phone does today. This worked but severely limited the ability for users to change the look, exposure and feel of the material after it was shot. This was partly due to limited hardware ability but mostly market differentiation. They simply wanted customers to upgrade to their more expensive cameras as Canon sold a “pro” grade version of their DSLRs. On top of this, all these cameras were shooting 8 bit video which even further limited the ability to adjust colors later, similar to what I showed above.
The story could have ended here but luckily a bunch of people started hacking the cameras, getting creative with what you could coerce the camera into. Eventually people managed to convince the 5D Mark II to record raw footage onto the memory card and other cameras started getting similar features. Sony started getting serious with their mirrorless Alpha line of full frame cameras and started loading up on features to take on the Canon/Nikon duopoly on professional photography.
To shorten the story up, vendors eventually settled on a compromise where the camera records using industry standard compression such as H.264 or H.265 but allows the user to pack the data in ways that makes it easier to adjust later. For example, cameras today often allow users to record in 10-bit, which results in a 98% increase in available color resolution. On top of that, cameras also pack video using a logarithmic profile that distributes the luminance in a more effective way. For example, packing more detail into the shadows and ranges where skin tones are prevalent instead of the highlights.

So this is what comes out of the Sony A7 IV when you shoot in SLOG3 (the third version of their logarithmic packing). You can see that it seems more “gray” which is a side effect of how the SLOG3 profile packs the colors into the 10 bit video. What’s interesting here however is that the way the camera packs the colors are now known both by the camera and you, which means you can counteract the way the colors are packed in a consistent way.
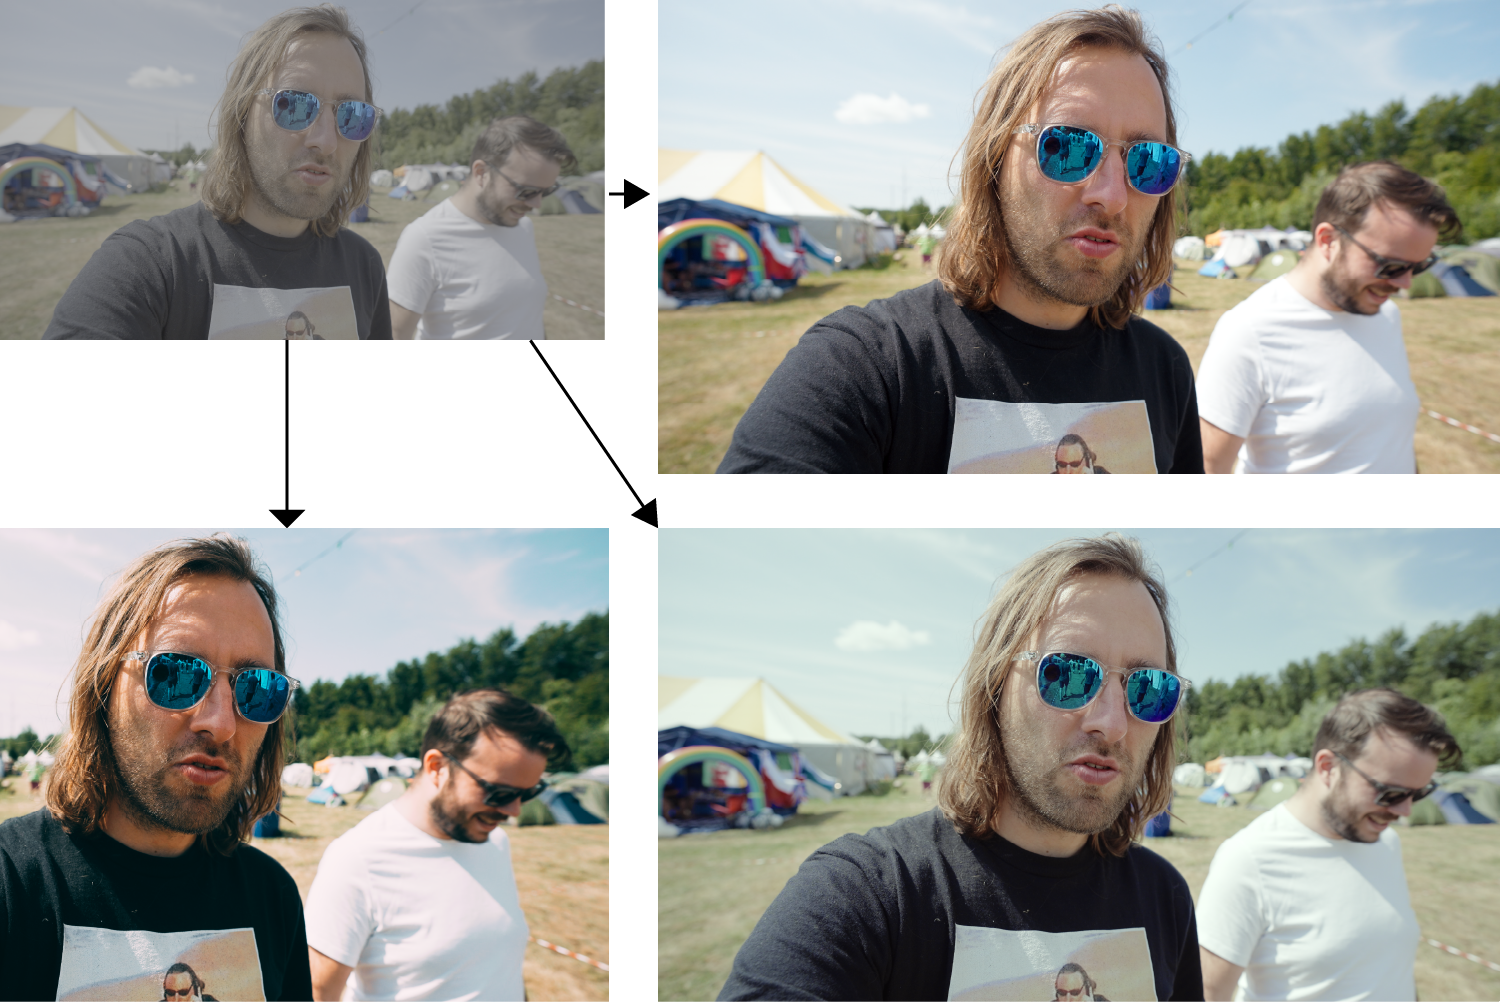
While LOG footage doesn’t give you as much freedom as RAW images does in terms of recovery, it’s great at allowing you to define the look of the video footage after it’s shot. The image above showcases three widely different ways of interpreting the footage, allowing creators to retain their style over multiple pieces of footage.
There are exceptions here. My main “studio” camera, the Blackmagic Pocket Cinema Camera 4K is contrary to the name, absolutely terrible to use as a handheld camera. Blackmagic Design is such an enigma as a company, their RAW story is years ahead of the rest of the industry but their cameras still manage to get so many things wrong. If Blackmagic ever produces a handheld camera that isn’t eating batteries for breakfast, has hardware image stabilization, great autofocus and a reasonable LCD screen they will have ended the rest of the industry. Knowing Blackmagic though they likely will keep staying weird.
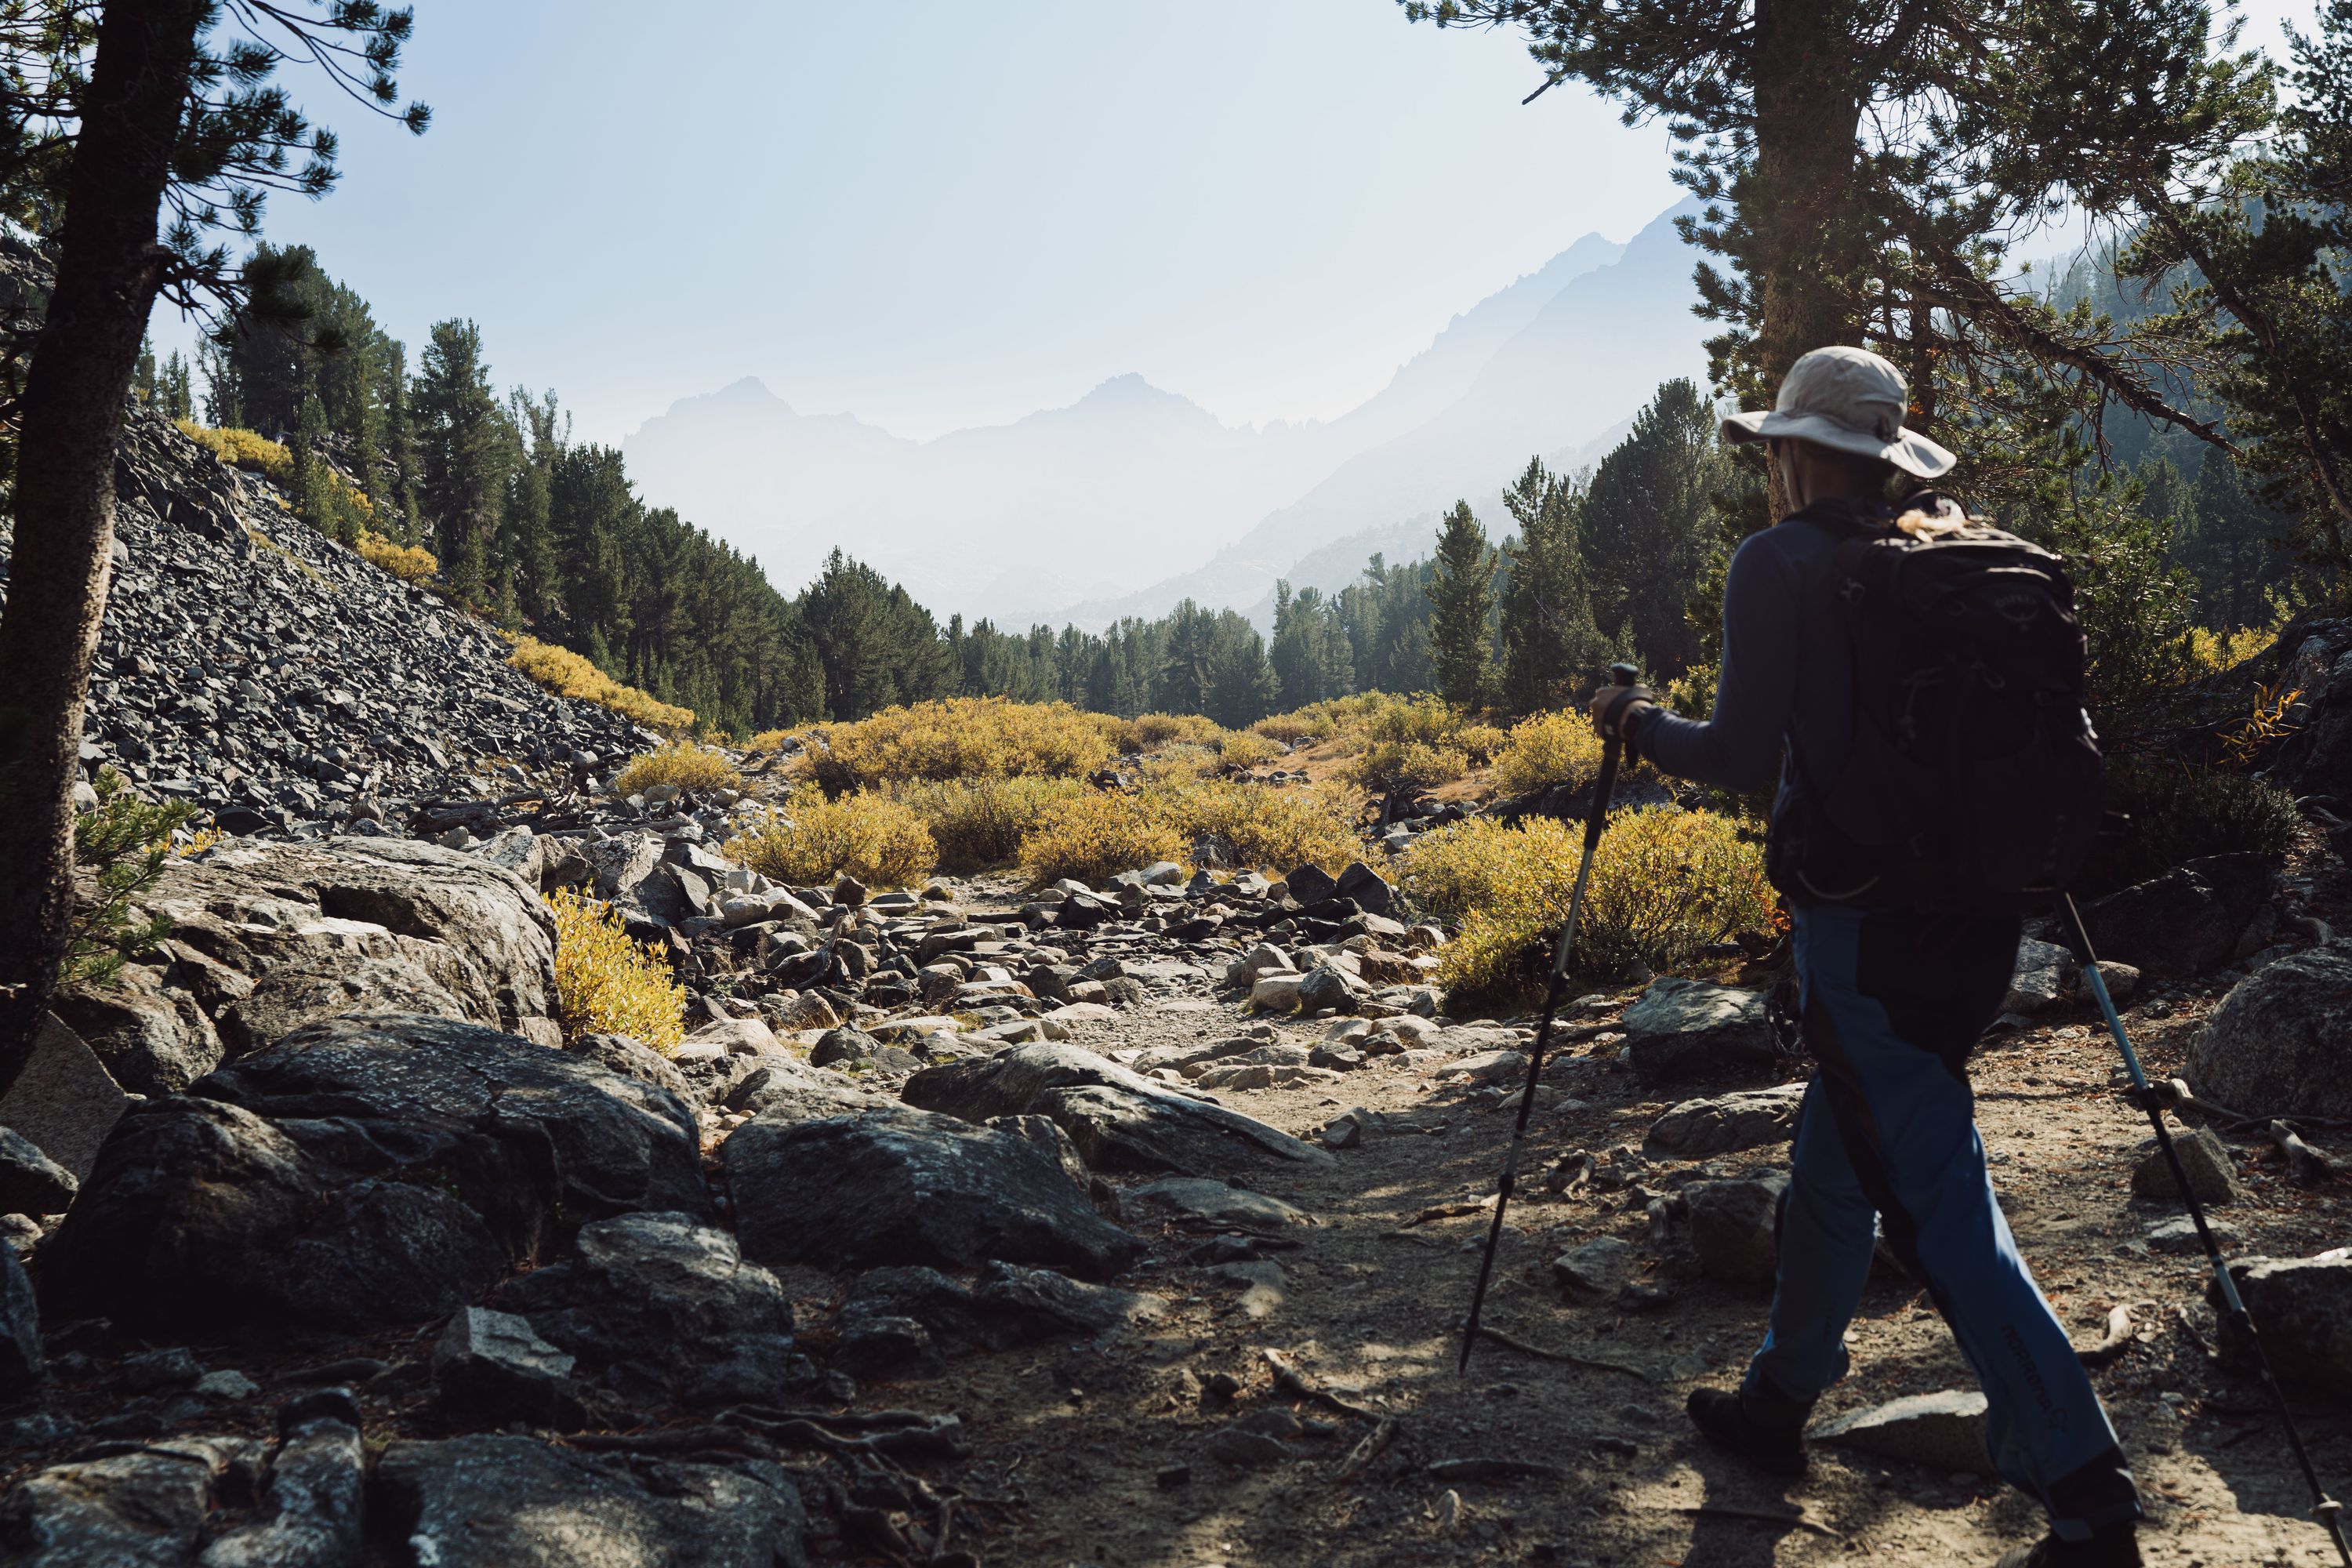
I’ve amassed a large amount of gear over my 10+ years of working in broadcast and at a certain point the challenge is in what gear to leave behind rather than what gear to bring. The more gear you carry the harder it is to be spontaneous. Since I probably would be hauling everything on my back in addition to my own clothes etc it made sense to pair this down. At the same time, just bringing a GoPro and a stick would limit the amount of flexibility I get. GoPro’s have developed to look almost too good for their size but they are still terrible in low light due to the sensor size.
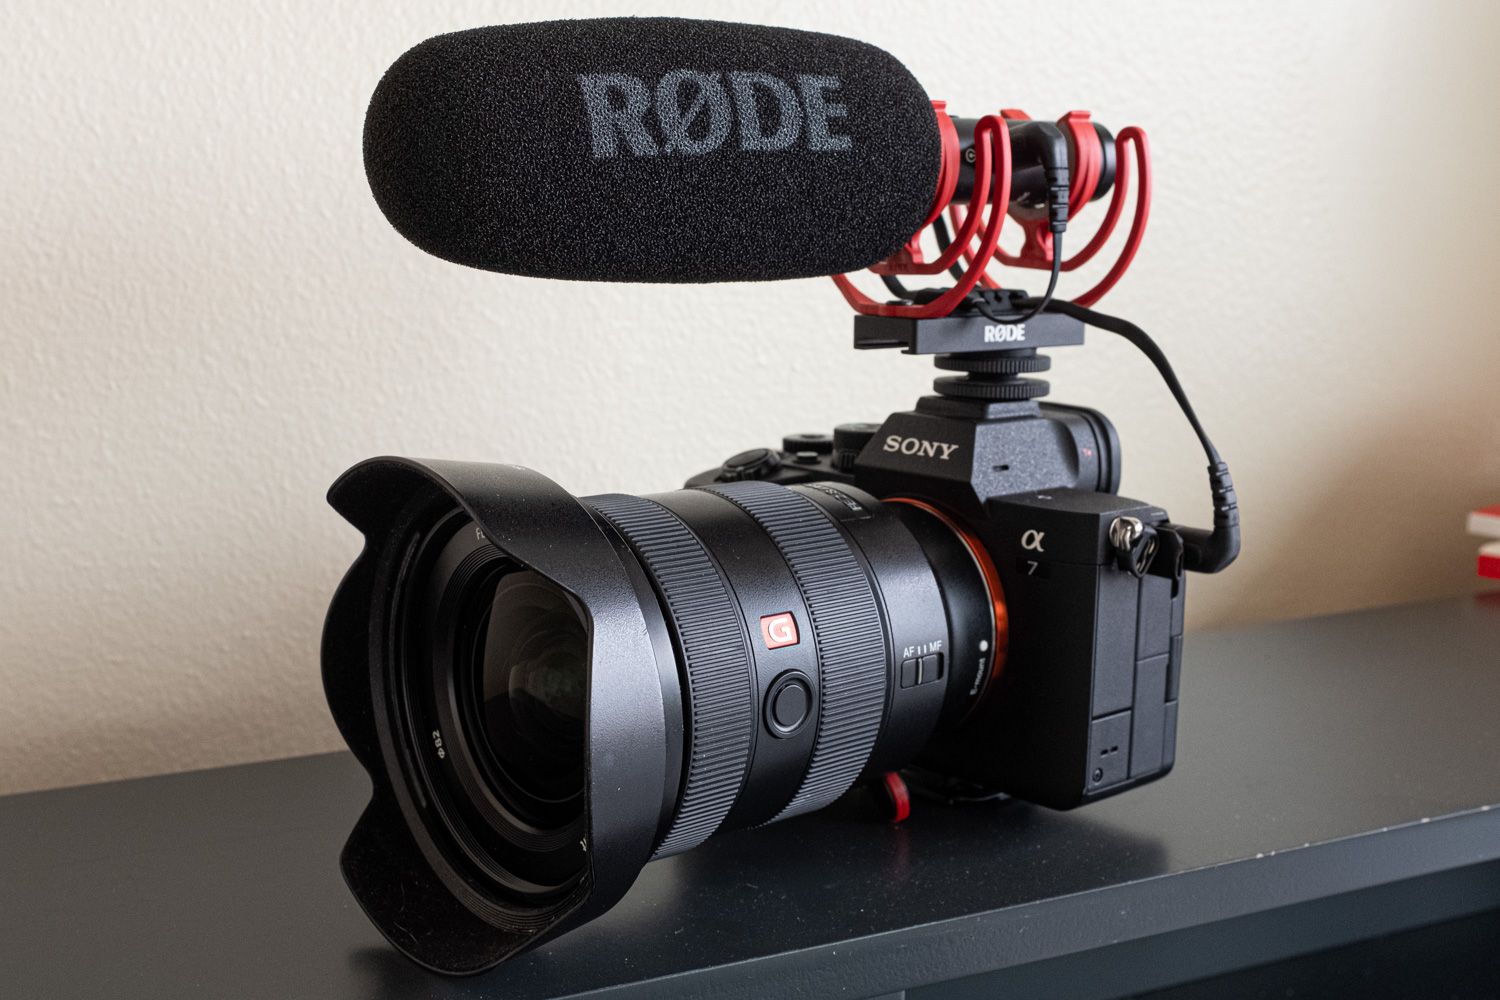
After considering this for a while I decided to try using the Sony A7 IV (which is our main photography camera these days). It amazes me how far mirrorless cameras have come to where I began in broadcast. Not only does the camera shoot 4K in 10bit with great colors, it only has what’s probably the best autofocus on the market. The autofocus is bang on, all the time, something that really matters when you’re holding the camera in your left hand, drunk, tired, on a field in the Netherlands.
I coupled this with the Sony FE 16-35mm F2.8 GM lens, a wide angle lens that allowed me to easily film myself while holding the camera in my hand. I wish the lens was 18-50mm but lenses in that range often had apertures at 3.5 or 4.5 which was less optimal at night. The reason a lot of the material came out so clear is due to the wider aperture of this lens, allowing the camera to soak in the available light.
On top of the camera I slapped the RØDE VideoMic NTG which did a decent job of capturing directional audio. Videomics used to be a hassle but this mic turns itself on automatically when the camera starts and likewise shuts down when the camera does, preserving battery. It also records bracketed audio in the microphone, something that basically allowed this video to even be made. What does bracketed audio mean?
Similarly to images, audio has a limited amount of range that it uses to represent signals. In the digital world you measure audio in decibel downwards from maximum, meaning that 0 dBFS is the maximum at which point there is no more headroom available to represent the audio. This is what people call “digital clipping” and creates unpleasant distorsion in the audio.
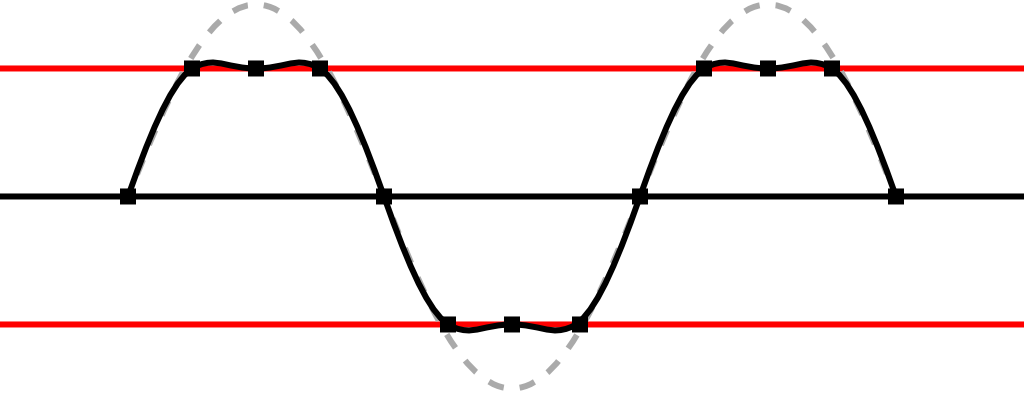
The first clip here represents how the audio should sound like
And this is what happens when a microphone captures audio that’s louder than what the available headroom is configured to
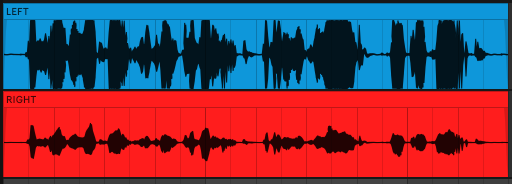
This is really hard to predict when filming. If you set the gain too low, you risk not having enough signal to hear what people are saying and if you set it too loud you’re unable to deal with people speaking loud, music or yelling. Bracketing solves this by recording two different versions of the audio, exploiting the fact that the microphone is mono recording onto a stereo track. Instead of duplicating the first track to the second to fill the stereo audio, the microphone records the left channel at the set gain and the right channel at -20dB. This way there’s always a safe option to mix over to in post production if you blow out the left channel with a safe duplicate of the audio.
It’s hard to say exactly when Blackmagic’s DaVinci Resolve crossed from being clown software into being actually good. I know trying the editing around version 11 and being severely unimpressed. Contrary to my earlier judgment, Blackmagic’s approach has paid off as they now sit on what I think is the only tool on the market that’s a “one stop shop” for editing -> compositing -> grading. No other tool allows you to simply do all of these things while also costing $0 ($295 if you need the professional codecs). It’s remarkable how good Resolve has become and editing this was a joy, apart from the classic odd bugs that only Blackmagic can manage to produce.
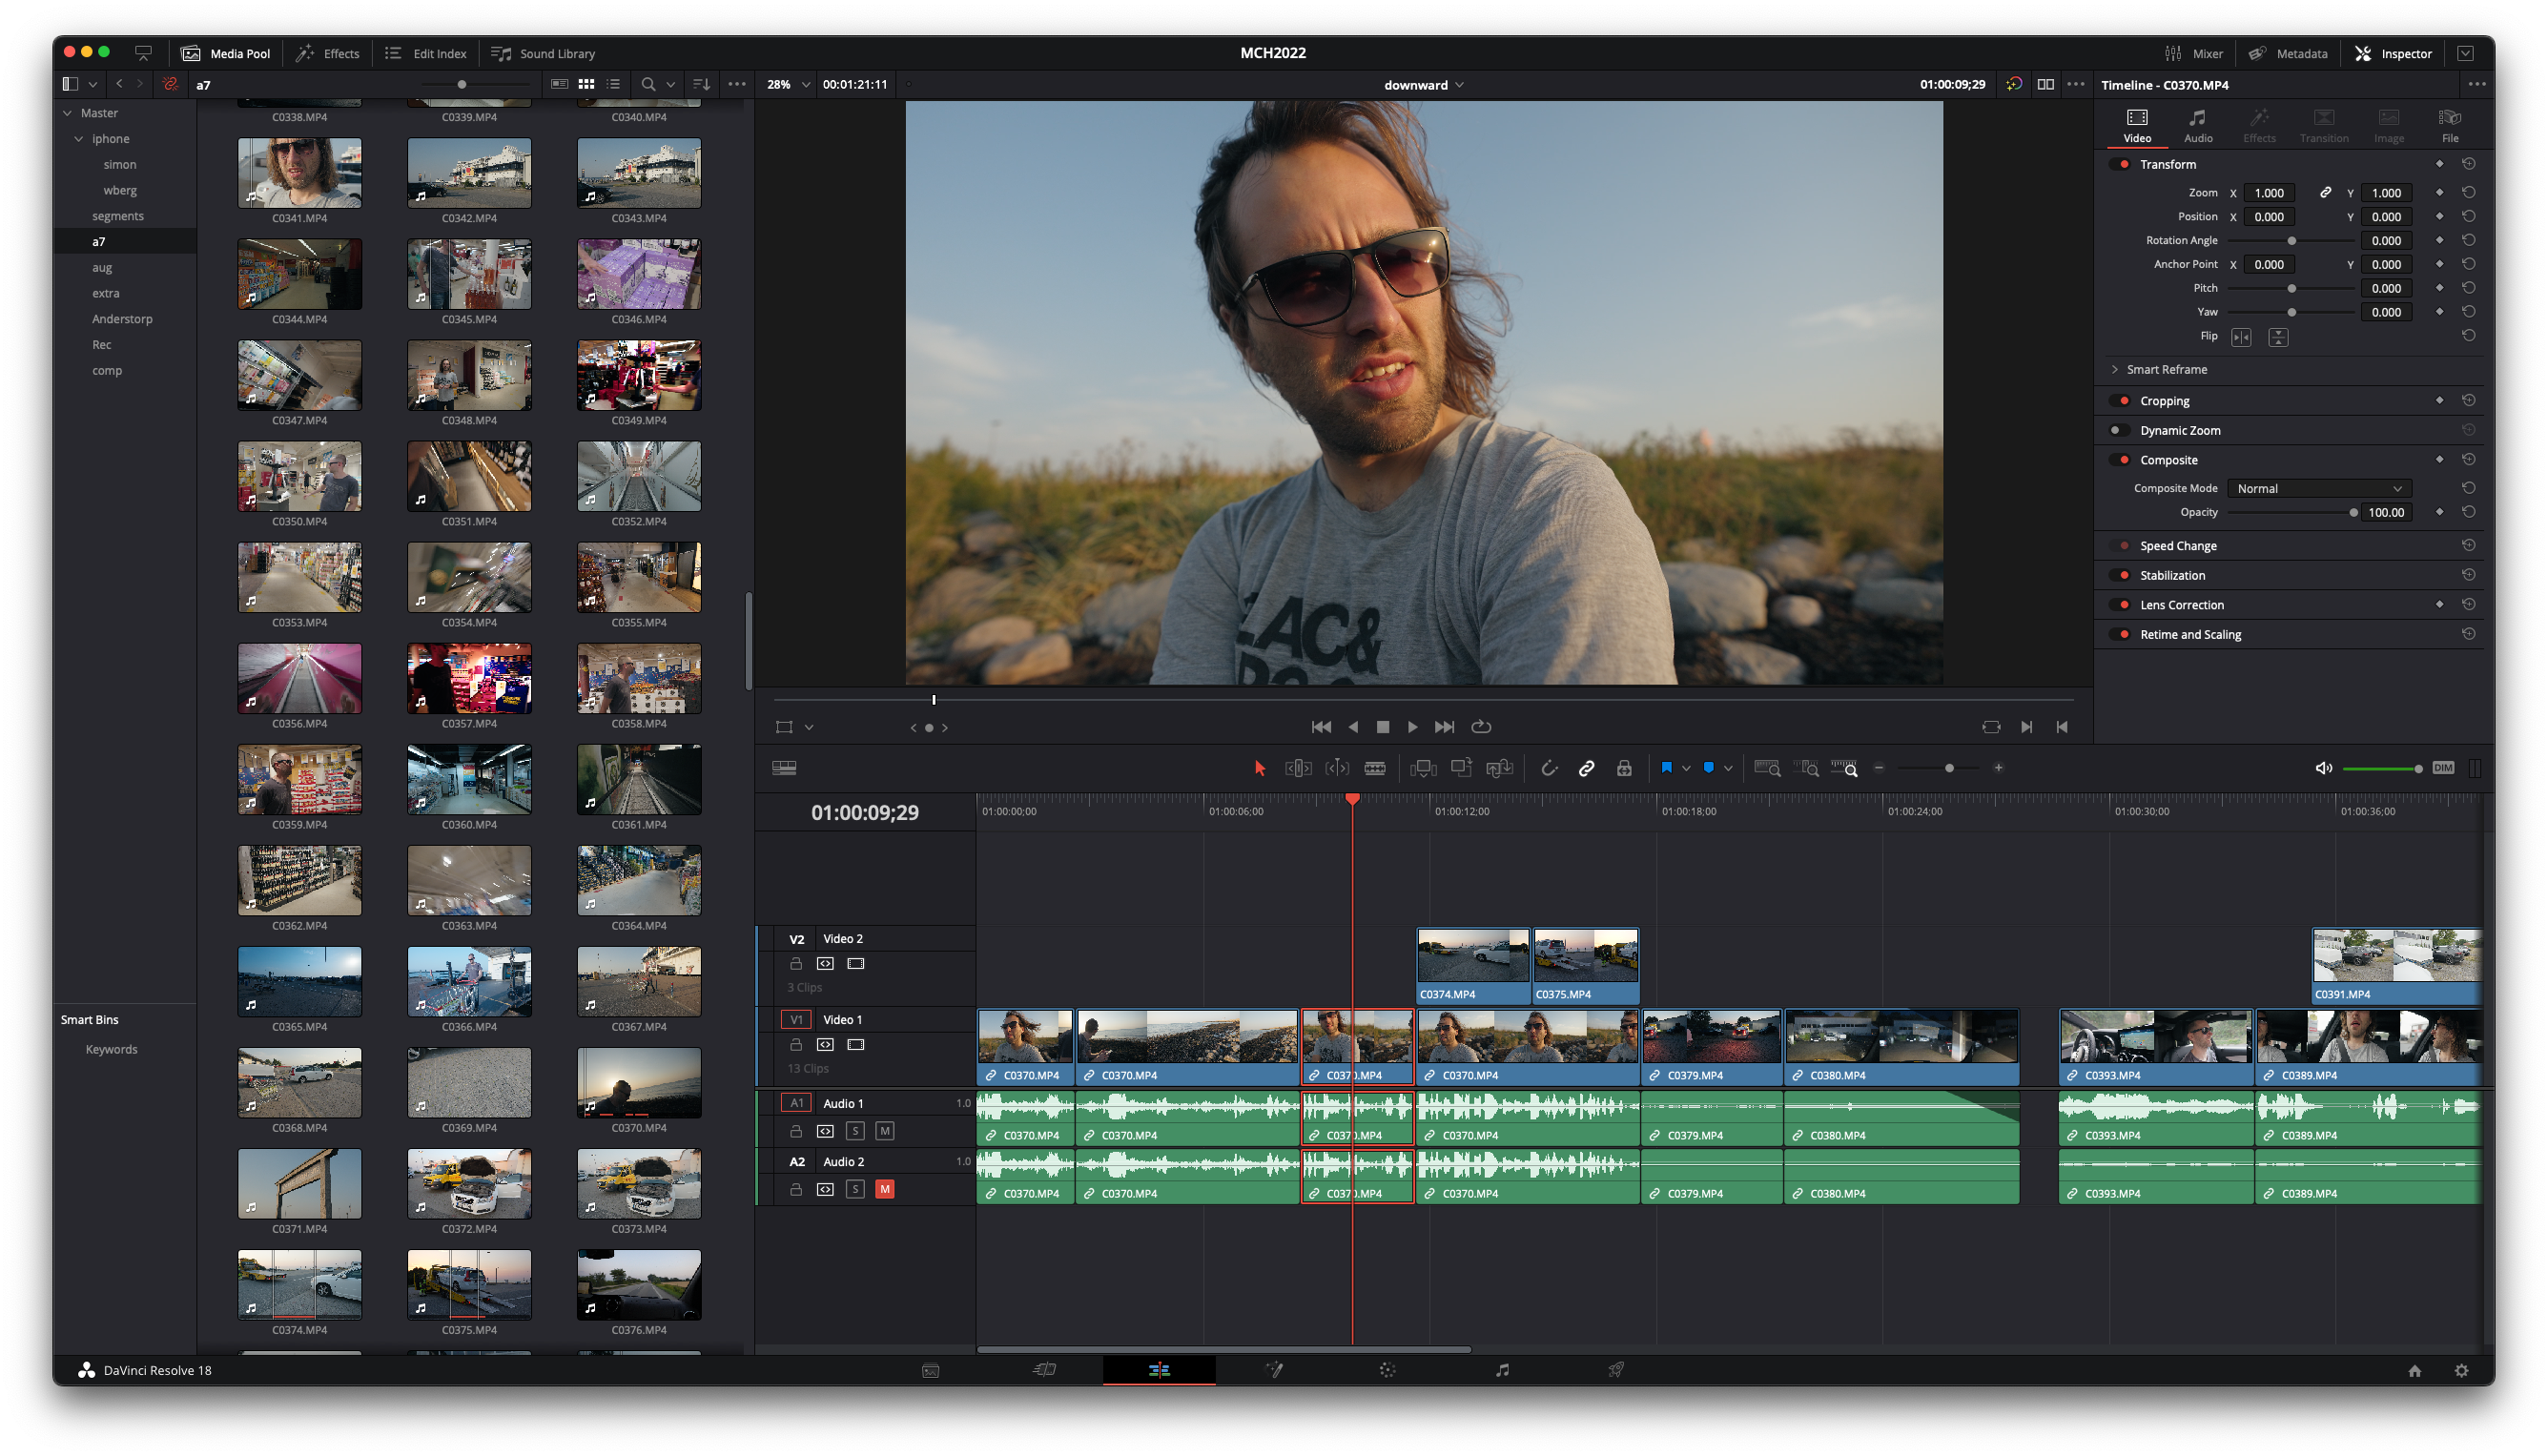
Resolve also allows you to import timelines into timelines, meaning that you can build nested storytelling components in isolation and assemble these later. This is something I always wanted from my time using VEGAS back in 2008 when timelines quickly became insanely complicated and hard to change.

Basically I cut all of the parts as individual segments ad-hoc. One of the mistakes I made when shooting is that I explained too little while on site. There was a lot of understanding of what we were doing in my head that I never articulated on the camera which made it really hard afterwards to come up with good ways of piecing together the story. Editing always starts from the storytelling and I was sitting with more of a collage of videos. To get a feel for how this could fit together, I edited the segments which I knew would work and went from there, eventually adding more voiceovers and new footage to supplement the footage I didn’t have from the event.
Would I do this again? Hard to say. The material is probably more fun to watch if you visited the event. Doing this again probably requires me to re-adjust my own participation in an event like this, focusing more on actually filming than creating the events for the participants. This tension is what kept me from doing a better video this time around so we’ll see. Bornhack did ask me to do a similar one for them so maybe that’s the jam? Time will tell.
